Updated: July 25, 2024
This page offers a detailed guide on how to use the Trip Planner function on Geovea’s mobile and tablet interfaces. Choose from the following step-by-step guides and advice to help you proficiently plan your journeys using the platform’s different tools and features. Instructions on trip creation, waypoint addition, route optimization, and preference customization are included. This guide is designed to help users get the most out of the Trip Planner’s effectiveness and ease of use.
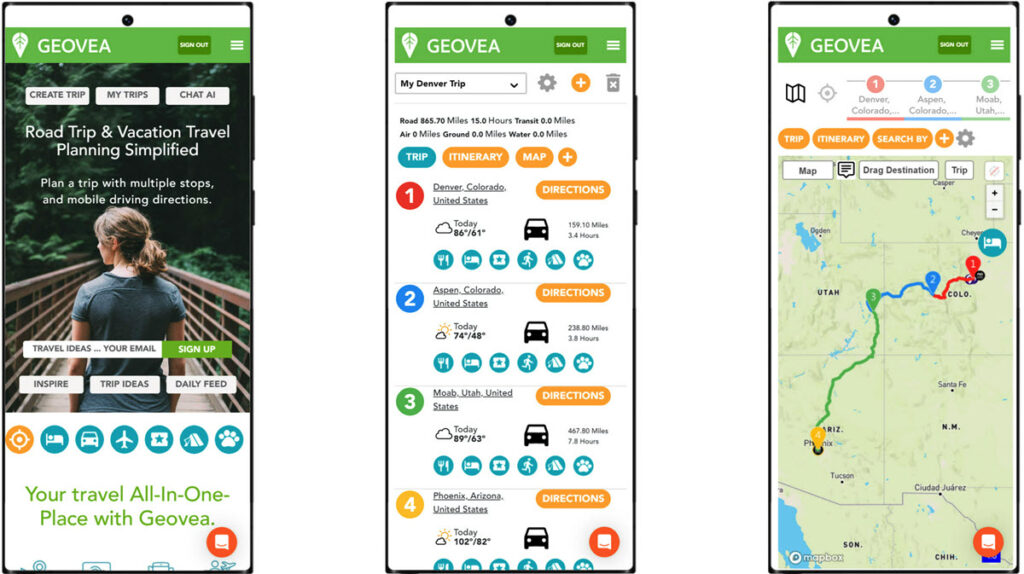
Mobile and Tablet Articles
Mobile and Tablet Videos
- 00:00 – Travel Planning App, & Smartphone Navigation
- 00:17 – Create A New Trip
- 00:26 – Travel Inspiration Tabs – Pictures, Trip Ideas & Videos
- 00:35 – Look for Trip Ideas
- 00:49 – Reviewing the saved Geovea Trip Idea modal
- 01:11 – Linked web articles
- 01:19 – Linked accommodations websites
- 01:26 – Geovea Staff Picks – restaurants, bars, lodging, rentals, places & activities
- 01:39 – Favoring staff pick Events
- 01:45 – Lodging & rentals staff picks
- 01:56 – Easily add staff-pick Events to your itinerary
- 02:06 – Add more Destinations to a Trip Idea
- 02:20 – Adding Events to a New Destination
- 02:54 – Completed Trip
- 03:02 – Converting your Trip to a Days View schedule
- 03:25 – Schedule Events to your Days View
- 03:53 – Detailed Trip Itinerary
- 04:09 – Flagging booked Events and adding notes
- 04:14 – Adding estimated and actual trip costs
- 04:20 – Sharing your Trip Idea with another person
- 04:26 – Downloading a PDF version of your Trip Idea
- 04:31 – Smartphone Navigation with your Trip Idea
- 04:56 – The Daily Feed – daily travel inspiration articles, pictures & videos
- 05:09 – Inspirational pictures
- 05:15 – Inspirational articles
- 05:23 – Filtering and searching Daily Feed content
- 05:32 – Favoring Daily Feed Content
- 05:42 – My Favorites on the Trip Planner
- 05:50 – Daily Feed content on the Trip Planner
- 05:58 – Closing
- 00:00 – Delete Trips, Destinations, Events, and Favorites on Desktop and Mobile
- 00:10 – Intended Audience
- 00:17 – Logging In Or Creating An Account
- 00:29 – Navigating The Website – Desktop And Laptop
- 00:47 – Select And Delete A Trip
- 01:06 – Delete A Destination
- 01:18 – Delete A Event
- 01:34 – Delete A Favorite – Tablet And Mobile
- 01:48 – Select And Delete A Trip
- 02:13 – Delete A Destination
- 02:23 – Delete A Favorite
- 00:00 – User Trips on a Mobile Device
- 00:10 – Intended Audience
- 00:23 – Logging In Or Creating An Account
- 00:35 – Navigating The App
- 00:51 – Create A New Trip Form
- 00:58 – Creating And Viewing A New Trip
- 01:25 – Trip Selection And Tools
- 01:45 – Delete A Trip
- 01:53 – Rename A Trip
- 02:02 – Share A Trip
- 02:11 – Modify A Trip
- 02:19 – Modify A Destination
- 02:28 – Delete A Destination
- 02:35 – Adding A Destination
- 02:42 – Updated Trip And Destinations
- 02:51 – Quick Destination Search
- 03:25 – Navigating On Your Mobile Phone
- 00:00 – Mobile Trip Navigation
- 00:09 – Signing In
- 00:27 – Selecting A Trip
- 00:40 – Selecting A Destination
- 00:43 – Getting Destination Directions (Google Maps Example)
- 00:59 – Starting Destination Navigation (Google Maps Example)
- 01:06 – Selecting A Event
- 01:19 – Getting Event Directions (Google Maps Example)
Related Links
- Trip Planner Help
- Explore AI Travel Tools
- Trip Planning Basics with Geovea
- Create your First Simple Road Trip
- View, Print Trip Itinerary and Map – Desktop & Laptop
- Reorder Destinations – Desktop & Laptop
- Share Trip By Email – Desktop & Laptop
- Geovea Travel Chat AI: Your Ultimate Personalized Travel Planner to Unearth Hidden Destination Gems
- Geovea Travel Chat AI: Hassle-Free, Personalized Road Trip Planning
Common Links
- Add Destinations (up to 25) and unlimited Places
- Add optional Trip Plan Title (one will automatically be created)
- Select the “Create My Trip” button
- Then view and modify the trip for your travel needs
